Teil 10: OSDProd Deployment Share erstellen

Inhaltsverzeichnis

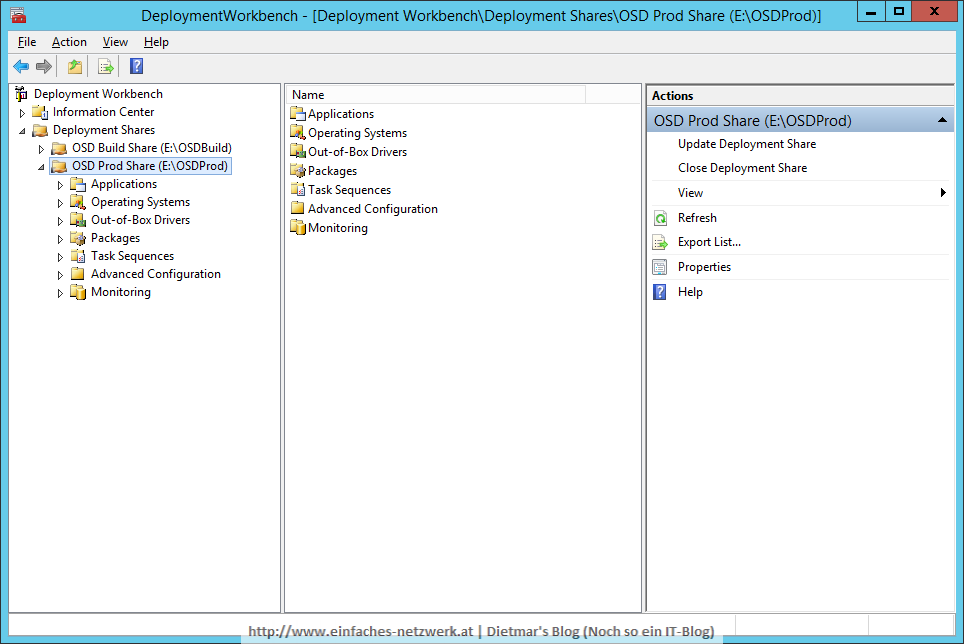
In diesem Teil werde ich den OSDProd Deployment Share erstellen und die ersten Inhalte hinzufügen.

OSDProd Deployment Share erstellen

Die detaillierte Anleitung siehe OSDBuild Deployment Share erstellen

  1. Als Administrator an MDT1 anmelden
  2. Deployment Workbench starten
  3. Folgenden Deployment Share hinzufügen
    1. Deployment share path: E:\OSDProd
    2. Share name: OSDProd$
    3. Descriptive name: OSD Prod Share
      OSD_PROD-001

Anwendungen hinzufügen

Die detaillierte Anleitung siehe Anwendungen zur Deployment Workbench hinzufügen

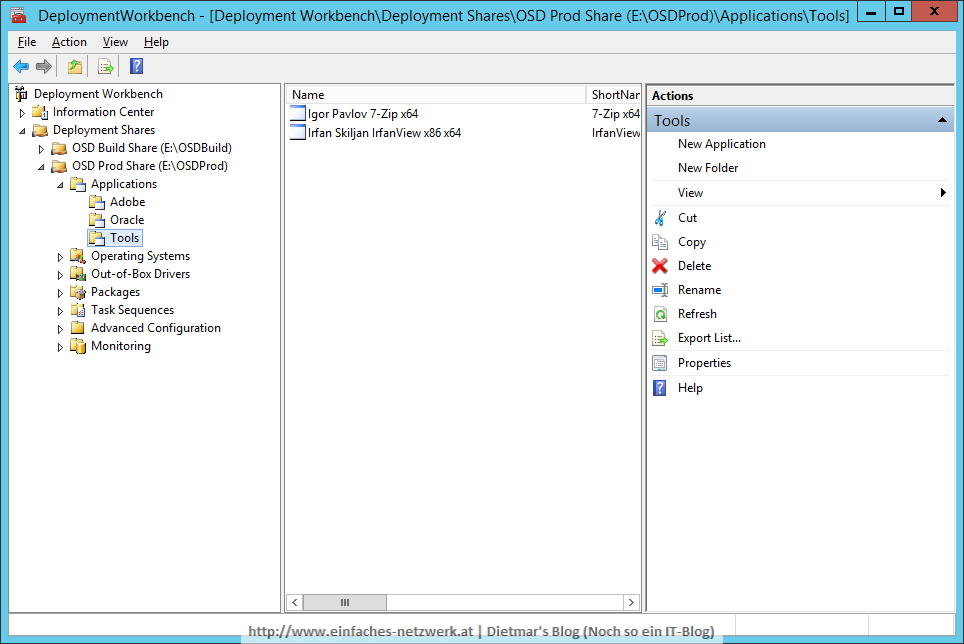
  1. Folgende Ordner unter Applications erstellen
    1. Adobe
    2. Oracle
    3. Tools
  2. Folgende Anwendungen zum Ordner Adobe hinzufügen
    1. Adobe AIR x86 x64
      1. Applcation type: Application with source files
      2. Publisher: Adobe
      3. Application name: AIR x86 x64
      4. Source directory: E:\Sourcen\Software\Adobe\Adobe AIR x86 x64
      5. Destination: Adobe AIR x86 x64
      6. Command line: install.exe
    2. Adobe Reader DC x86 x64
      1. Applcation type: Application with source files
      2. Publisher: Adobe
      3. Application name: Reader DC x86 x64
      4. Source directory: E:\Sourcen\Software\Adobe\Adobe Reader DC x86 x64
      5. Destination: Adobe Reader DC x86 x64
      6. Command line: install.exe
    3. Adobe Shockwave Player x86 x64
      1. Applcation type: Application with source files
      2. Publisher: Adobe
      3. Application name: Shockwave Player x86 x64
      4. Source directory: E:\Sourcen\Software\Adobe\Adobe Shockwave Player x86 x64
      5. Destination: Adobe Shockwave Player x86 x64
      6. Command line: install.exe
  3. Folgende Anwendungen zum Ordner Oracle hinzufügen
    1. Oracle Java RE 8 x86 x64
      1. Applcation type: Application with source files
      2. Publisher: Oracle
      3. Application name: Java RE 8 x86 x64
      4. Source directory: E:\Sourcen\Software\Oracle\Oracle Java RE 8 x86 x64
      5. Destination: Oracle Java RE 8 x86 x64
      6. Command line: install.exe
  4. Folgende Anwendungen zum Ordner Tools hinzufügen
    1. Irfan Skiljan IrfanView x86 x64
      1. Applcation type: Application with source files
      2. Publisher: Irfan Skiljan
      3. Application name: IrfanView x86 x64
      4. Source directory: E:\Sourcen\Software\Tools\Irfan Skiljan IrfanView x86 x64
      5. Destination: Irfan Skiljan IrfanView x86 x64
      6. Command line: install.exe
    2. Igor Pavlov 7-Zip x64
      1. Applcation type: Application with source files
      2. Publisher: Igor Pavlov
      3. Application name:  7-Zip x64
      4. Source directory: E:\Sourcen\Software\Tools\Igor Pavlov 7-Zip x64
      5. Destination: Igor Pavlov 7-Zip x64
      6. Command line: install.exe
        OSD_PROD-002

Anwendungen im Deployment Wizard ausblenden

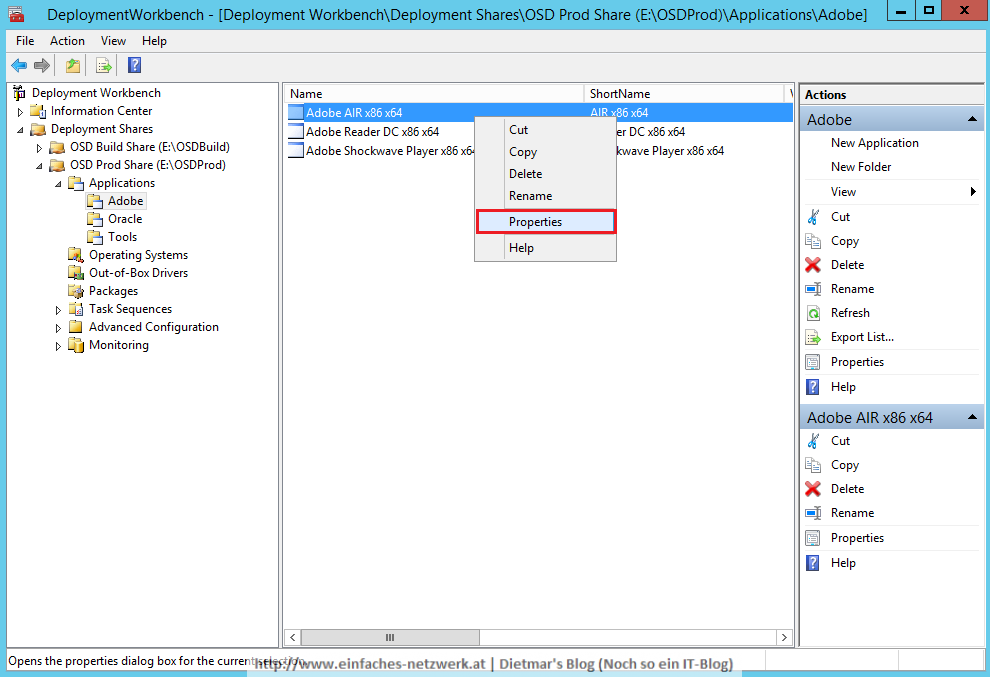
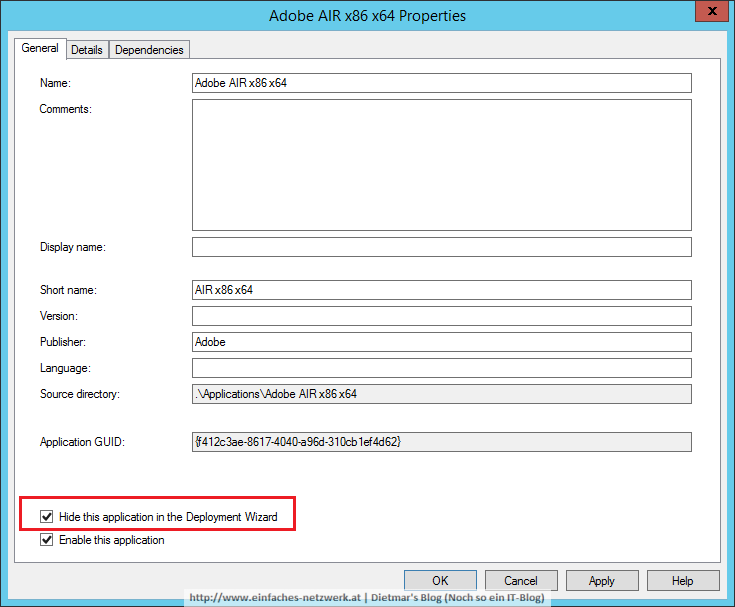
Die Laufzeiten von Adobe und Oracle Java RE8 werden immer installert und sollen nicht im Deployment Wizard zur Auswahl angezeigt werden.

  1. Die Anwendung Adobe AIR x86 x64 rechts anklicken > Properties
    OSD_PROD-004
  2. Hide this application in the Deployment Wizard aktivieren
    OSD_PROD-005
  3. Fenster mit OK schließen
  4. Folgende Anwendung im Deployment Wizard ausblenden
    1. Adobe AIR x86 x64
    2. Adobe Shockwave Player x86 x64
    3. Oracle Java RE 8 x86 x64

Betriebssystem hinzufügen

Die detaillierte Anleitung siehe Betriebssystem zur Deployment Workbench hinzufügen

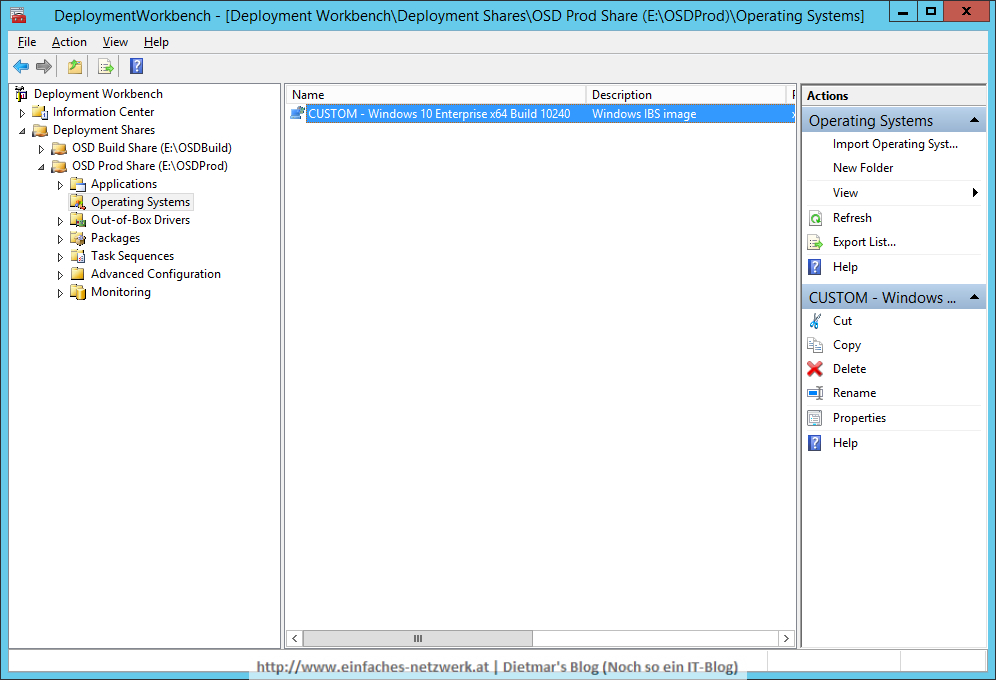
  1. Folgendes Betriebssystem hinzufügen
    1. OS Type
      1. Custom image file
    2. Image
      1. Source: E:\OSDBuild\Captures\W10240X64-001.wim
    3. Setup
      1. Copy setup files from specified path: E:\OSDBuild\Operating Systems\W10240X64
    4. Destination
      1. Destination directory name: Windows 10 Enterprise x64 Build 10240
  2. Das importierte Image umbenennen nach CUSTOM – Windows 10 Enterprise x64 Build 10240
    OSD_PROD-003

Im nächsten Teil werde ich Treiber importieren und ein Selection Profile erstellen.

Teil 9b: Exkurs – Die Installation von Adobe Reader anpassen

Inhaltsverzeichnis

In diesem Teil werde ich die Installation von Adobe Reader anpassen. Dafür wird der Adobe Customization Wizard verwendet. Ziel ist eine Installation

  • automatisiert ohne Anzeige
  • ohne Neustart
  • ohne Adobe Update
  • ohne Adobe Online Services
  • ohne Desktop-Verknüpfung
  • mit aktuellen Patches

Die Installationsdateien von Adobe Reader vorbereiten

  1. Als Administrator an MDT1 anmelden
  2. Adobe Reader nach E:\Sourcen\Software\Adobe\Adobe Reader DC x86 x64 herunterladen
  3. Command Prompt (Admin) starten
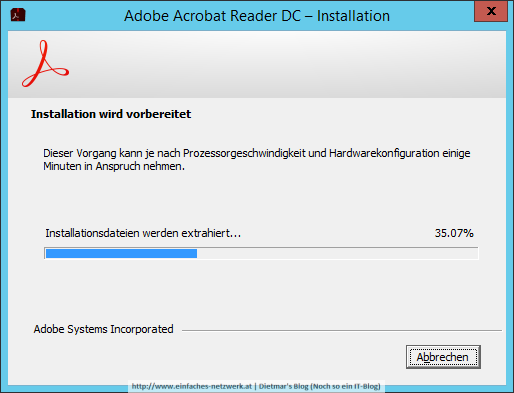
  4. Die Installationsdateien mit folgendem Befehl extrahieren
    AcroRdrDC1500820082_de_DE.exe -sfx_ne -sfx_o"E:\Sourcen\Software\Adobe\Adobe Reader DC x86 x64"

    ADOBE_READER-001 ADOBE_READER-002

Die Installation von Adobe Reader anpassen

  1. Adobe Customization Wizards herunterladen und installieren
  2. Adobe Custimization Wizard starten
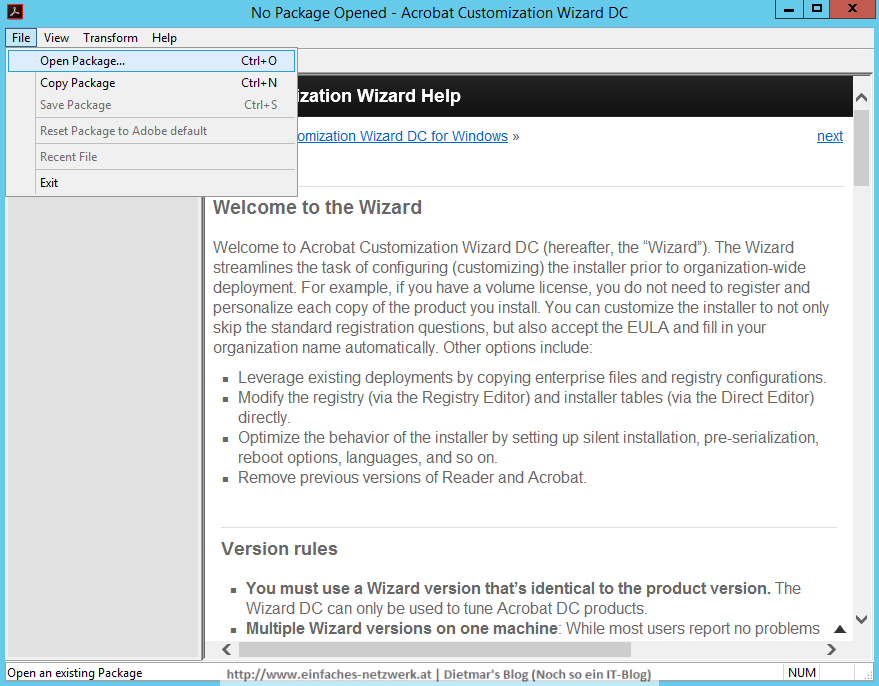
  3. File > Open Package… > E:\Sourcen\Software\Adobe\Adobe Reader DC x86 x64\AcroRead.msi
    ADOBE_READER-004
  4. Folgende Einstellungen konfigurieren
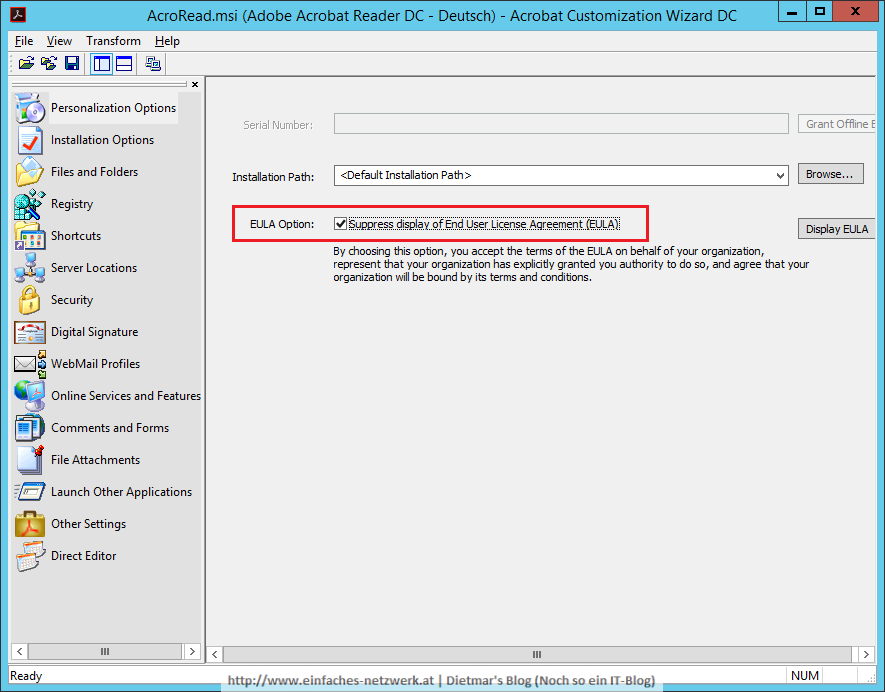
    1. Personalization Options
      ADOBE_READER-005
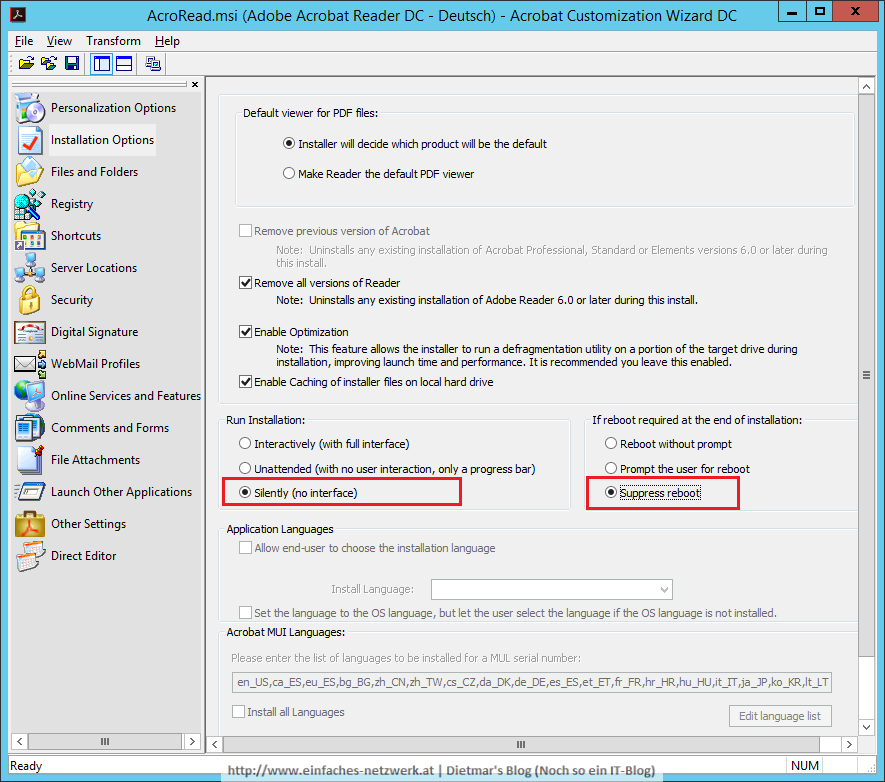
    2. Installation Options
      ADOBE_READER-006
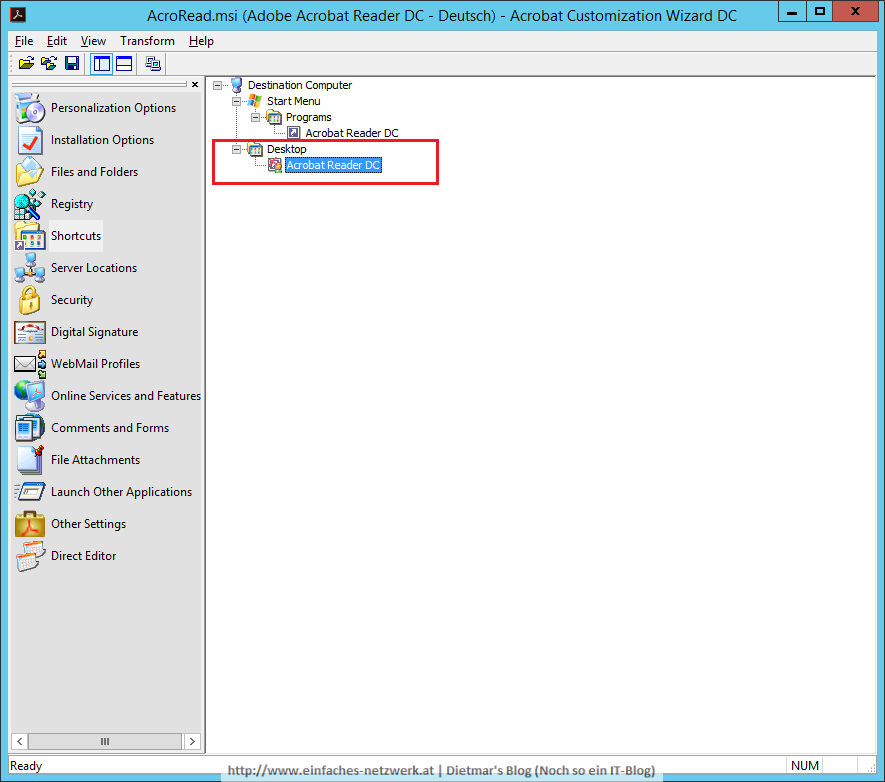
    3. Shortcuts
      ADOBE_READER-007
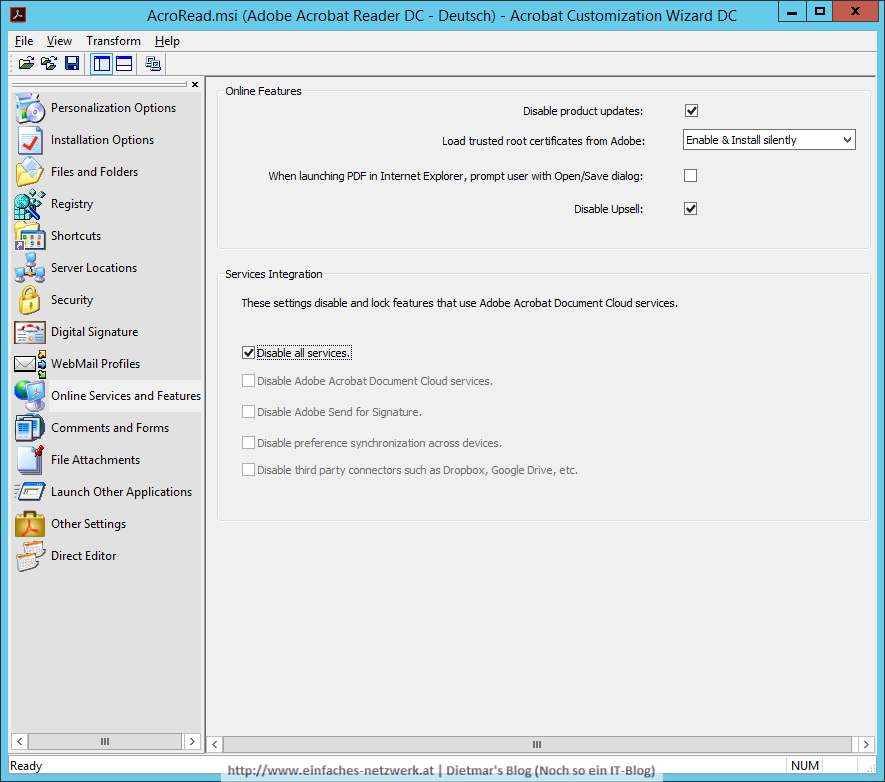
    4. Online Services and Features
      ADOBE_READER-008
  5. File > Save Package
  6. Adobe Custimization Wizard schließen
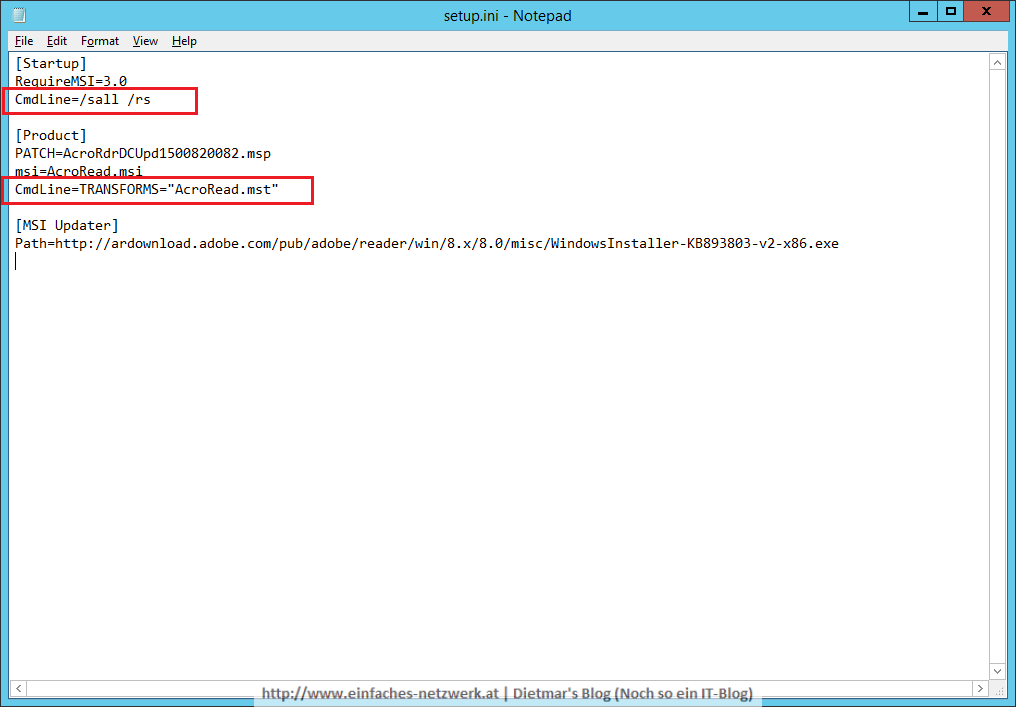
  7. Die Datei E:\Sourcen\Software\Adobe\Adobe Reader DC x86 x64\Setup.ini überprüfen
    ADOBE_READER-009
  8. Fenster schließen

AutoIt-Script erstellen und kompilieren

  1. Folgendes AutoIt-Script erstellen und kompilieren
    #cs ------------------------------------------------------------
    
     AutoIt Version: 3.3.14.1
     Author:         Dietmar's Blog | Noch so ein IT-Blog
     Script Function: Install Software.
    
    #ce ------------------------------------------------------------
    
    ; Script Start - Add your code below here
    
    Opt("TrayIconHide", 1)
    RunWait("setup.exe")
    
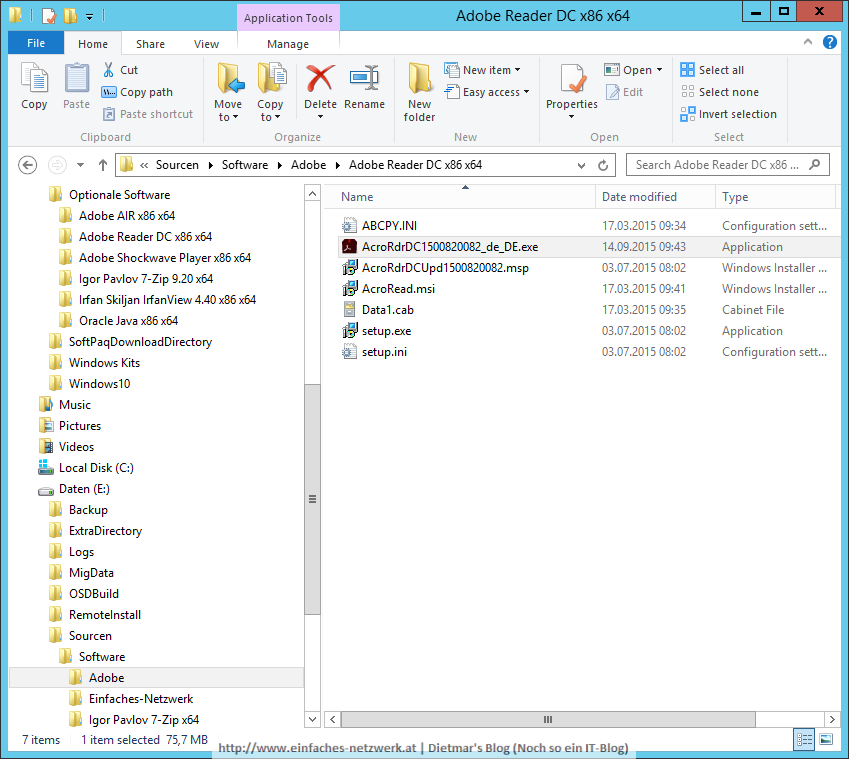
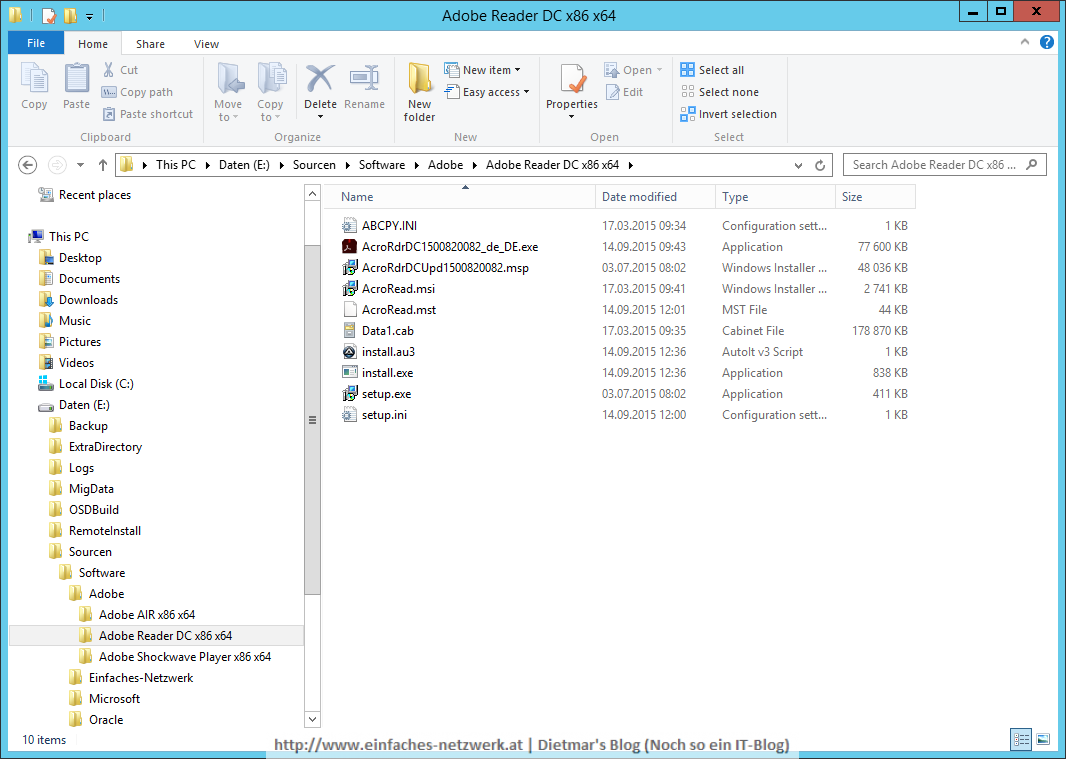
  2. Die Installationsdateien im Datei-Explorer
    ADOBE_READER-010

Teil 9a: Optionale Software vorbereiten

Für die Verteilung von Windows werde ich in diesem Teil optionale Software vorbereiten. Das sind Laufzeiten und Tools von diversen Drittanbietern. Dafür werde ich wieder mit AutoIt einfache Installations-Scripte erstellen (siehe Exkurs – AutoIt installieren und ein Programm erstellen), als install.au3 speichern und kompilieren.

  • Adobe AIR
  • Adobe Reader DC
  • Adobe Shockwave Player
  • Igor Pavlov 7-Zip
  • Irfan Skiljan IrfanView
  • Oracle Java

Optionale Software vorbereiten

  1. Als Administrator an MDT1 anmelden
  2. Adobe AIR
    1. Adobe AIR nach E:\Sourcen\Software\Adobe\Adobe AIR x86 x64 herunterladen
    2. Folgendes AutoIt-Script erstellen und kompilieren
      #cs ------------------------------------------------------------
      
       AutoIt Version: 3.3.14.1
       Author:         Dietmar's Blog | Noch so ein IT-Blog
       Script Function: Install Software.
      
      #ce ------------------------------------------------------------
      
      ; Script Start - Add your code below here
      
      Opt("TrayIconHide", 1)
      RunWait("AdobeAIRInstaller.exe -silent -eulaAccepted")
      
  3. Adobe Shockwave Player
    1. Adobe Shockwave Player nach E:\Sourcen\Software\Adobe\Adobe Shockwave Player x86 x64 herunterladen
    2. Folgendes AutoIt-Script erstellen und kompilieren
      #cs ------------------------------------------------------------
      
       AutoIt Version: 3.3.14.1
       Author:         Dietmar's Blog | Noch so ein IT-Blog
       Script Function: Install Software.
      
      #ce ------------------------------------------------------------
      
      ; Script Start - Add your code below here
      
      Opt("TrayIconHide", 1)
      RunWait("msiexec.exe /i sw_lic_full_installer.msi /qn /norestart")
      
  4. Igor Pavlov 7-Zip
    1. Igor Pavlov 7-Zip nach E:\Sourcen\Software\Tools\Igor Pavlov 7-Zip x64 herunterladen
    2. Folgendes AutoIt-Script erstellen und kompilieren
      #cs ------------------------------------------------------------
      
       AutoIt Version: 3.3.14.1
       Author:         Dietmar's Blog | Noch so ein IT-Blog
       Script Function: Install Software.
      
      #ce ------------------------------------------------------------
      
      ; Script Start - Add your code below here
      
      Opt("TrayIconHide", 1)
      RunWait("msiexec.exe /i 7z920-x64.msi /qn /norestart")
      
  5. Irfan Skiljan IrfanView
    1. Irfan Skiljan IrfanView nach E:\Sourcen\Software\Tools\Irfan Skiljan IrfanView x86 x64 herunterladen
    2. Folgendes AutoIt-Script erstellen und kompilieren
      #cs ------------------------------------------------------------
      
       AutoIt Version: 3.3.14.1
       Author:         Dietmar's Blog | Noch so ein IT-Blog
       Script Function: Install Software.
      
      #ce ------------------------------------------------------------
      
      ; Script Start - Add your code below here
      
      Opt("TrayIconHide", 1)
      RunWait("iview440_setup.exe.exe /silent /group=1 /assoc=1 /assocallusers=1")
      RunWait("irfanview_plugins_438_setup.exe /silent")
      
  6. Oracle Java
    1. Oracle Java für x86 und x64 nach E:\Sourcen\Software\Oracle\Oracle Java x86 x64 herunterladen
    2. Mit dem Notepad die Datei E:\Sourcen\Software\Oracle\Oracle Java x86 x64 \java_install.cfg mit folgendem Inhalt erstellen
      INSTALL_SILENT=Enable
      INSTALLDIR=C:\Program Files\Java\jre8
      STATIC=Disable
      AUTO_UPDATE=Disable
      WEB_JAVA=Enable
      WEB_JAVA_SECURITY_LEVEL=H
      WEB_ANALYTICS=Disable
      EULA=Disable
      REBOOT=Disable
      NOSTARTMENU=Enable
      SPONSORS=Disable
    3. Folgendes AutoIt-Script erstellen und kompilieren
      #cs ------------------------------------------------------------
      
       AutoIt Version: 3.3.14.1
       Author:         Dietmar's Blog | Noch so ein IT-Blog
       Script Function: Install Software.
      
      #ce ------------------------------------------------------------
      
      ; Script Start - Add your code below here
      
      Opt("TrayIconHide", 1)
      RunWait("jre-8u40-windows-i586.exe INSTALLCFG=X:\Applications\Oracle Java x86 x64\java_install.cfg")
      RunWait("jre-8u40-windows-x64.exe INSTALLCFG=X:\Applications\Oracle Java x86 x64\java_install.cfg")
      
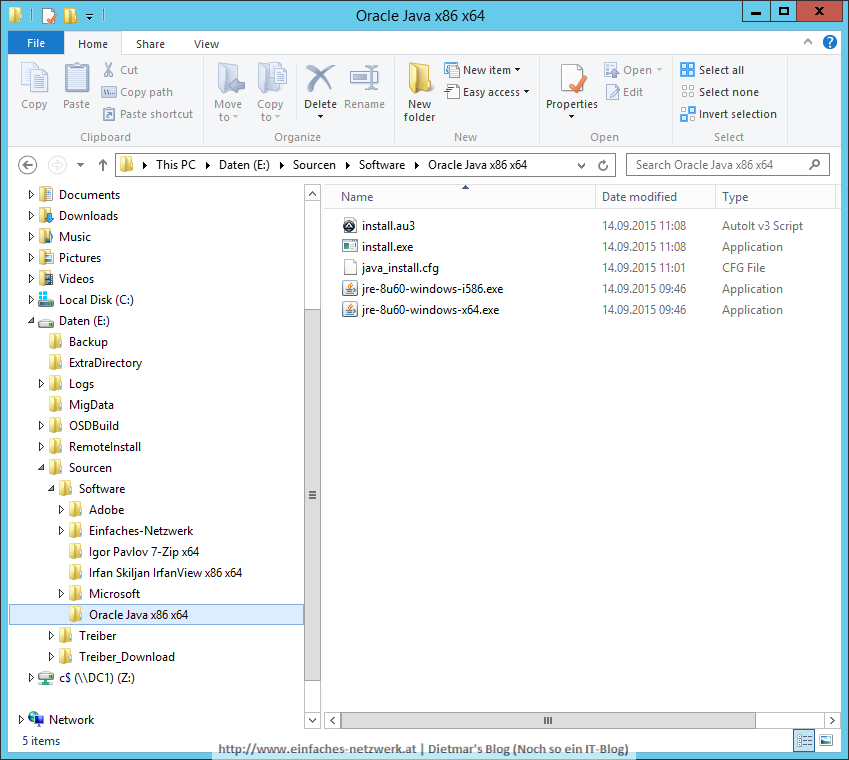
  7. Optionale Software im Datei-Explorer
    SOFTWARE

Im nächsten Teil werde ich die Installation des Adobe Reader DC mit Hilfe des Customization Wizards anpassen.