Teil 1c: DHCP und Routing installieren und konfigurieren

Die Server-Rollen DHCP und Routing installieren

  1. Als Administrator an DC1 anmelden
  2. Server Manager > Manage > Add Roles and Features
  3. Add Roles and Features Wizard
    1. Before You Begin: Next
    2. Installation Type: Role-based or feature-based Installation
    3. Server Selection: DC1 > Next
    4. Server Roles: DHCP Server > Add Features > Next
    5. Server Roles: Remote Access > Add Features > Next
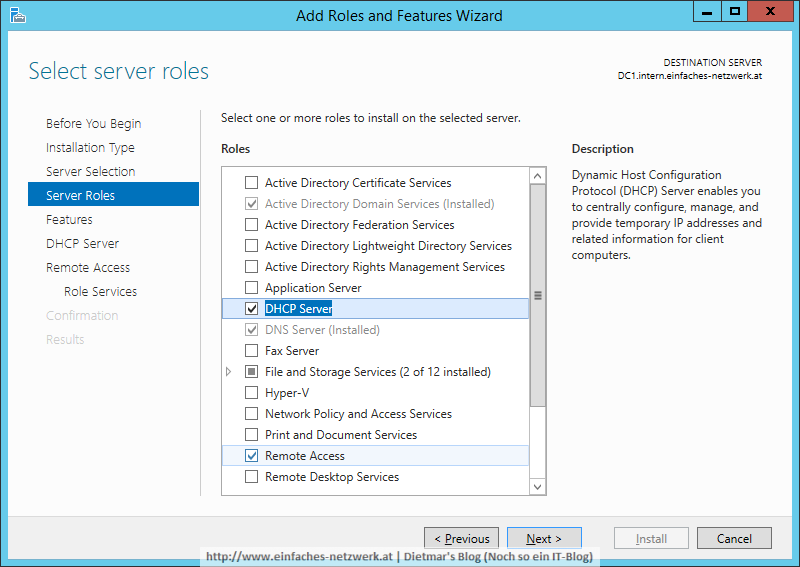
      DHCP-001
    6. Features: Next
    7. DHCP Server: Next
    8. Remote Access: Next
    9. Role Services: Routing anhaken > Add Features > Next
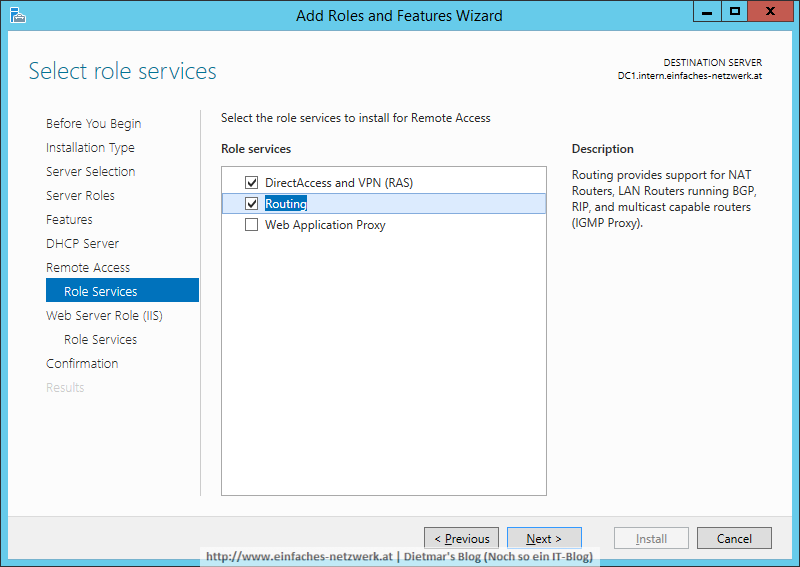
      DHCP-002
    10. Web Server Role (IIS): Next
    11. Role Services: Next
    12. Confirmation: Install
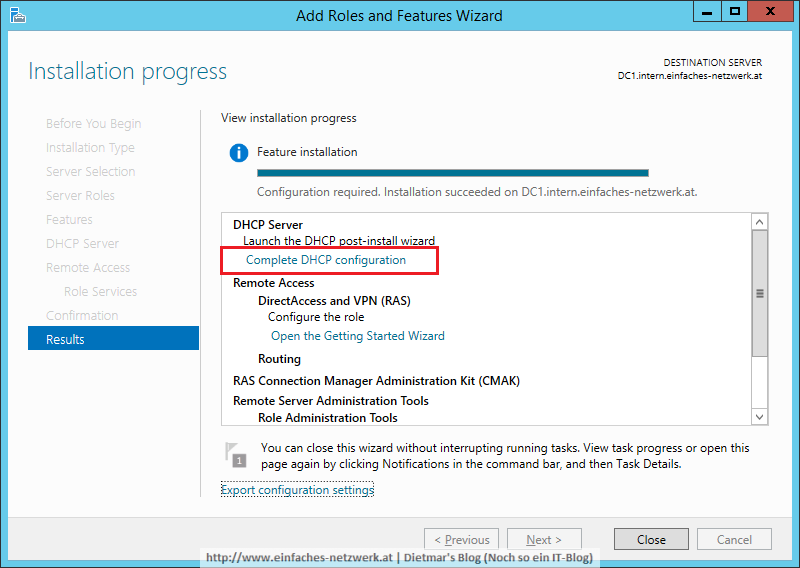
    13. Results > Complete DHCP configuration
      DHCP-007
  4. DHCP Post-Install configuration wizard
    1. Description > Next
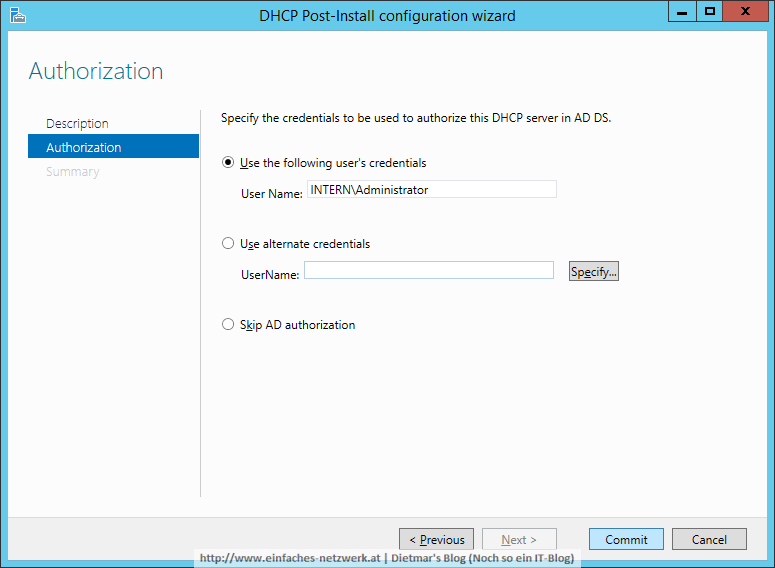
    2. Authorization > Commit
      DHCP-005
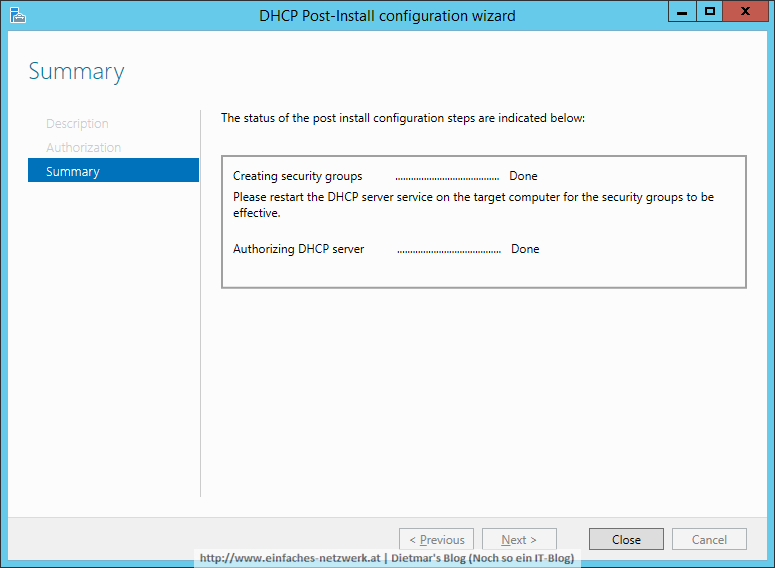
    3. Summary > Close
      DHCP-006
  5. Alle Fenster schließen

DHCP-Server konfigurieren

  1. Server Manager > Tools > DHCP
  2. dc1.intern.einfaches-netzwerk.at erweitern
  3. IPv4 rechts anklicken > New Scope
  4. New Scope Wizard
    1. Welcome… > Next
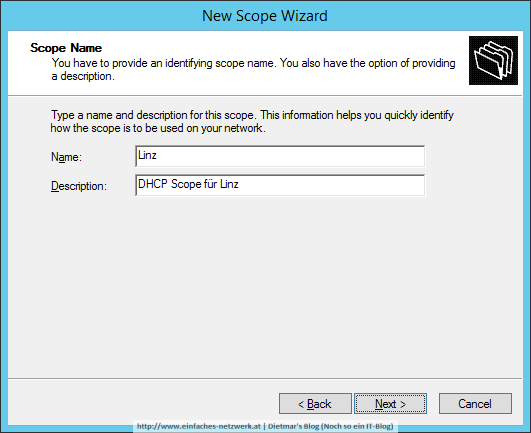
    2. Scope Name:
      1. Name: Linz
      2. Description: DHCP Scope für Linz > Next
        DHCP-008
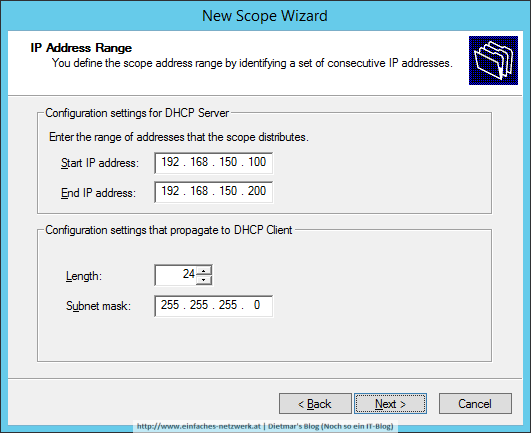
    3. IP Address Range:
      1. Start IP address: 192.168.150.100
      2. End IP addess: 192.168.150.200
      3. Lenght: 24
      4. Subnet mask: 255.255.255.0 > Next
        DHCP-009
    4. Add Exclusions and Delay: Next
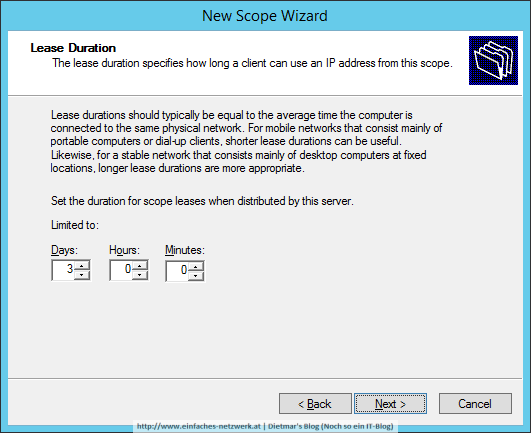
    5. Lease Duration: Days: 3 > Next
      DHCP-010
    6. Configure DHCP Options: Yes, I want to configure these options now > Next
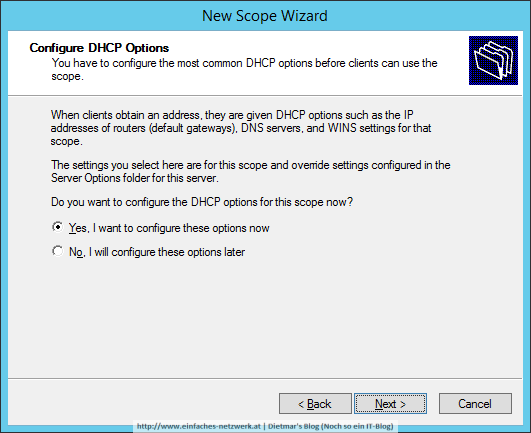
      DHCP-011
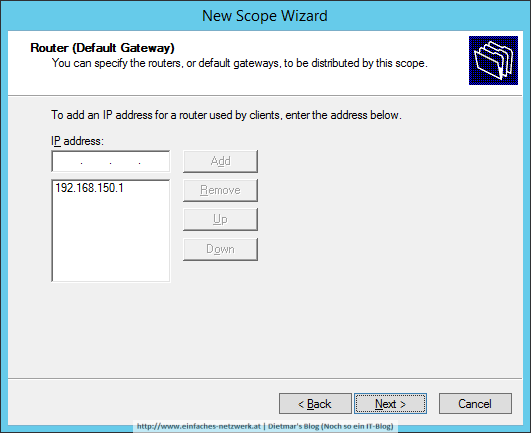
    7. Router: 192.168.150.1 > Add > Next
      DHCP-012
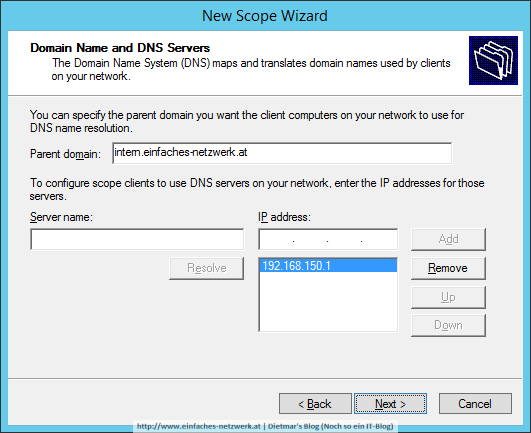
    8. Domain Name and DNS Servers
      1. Parent domain: intern.einfaches-netzwerk.at
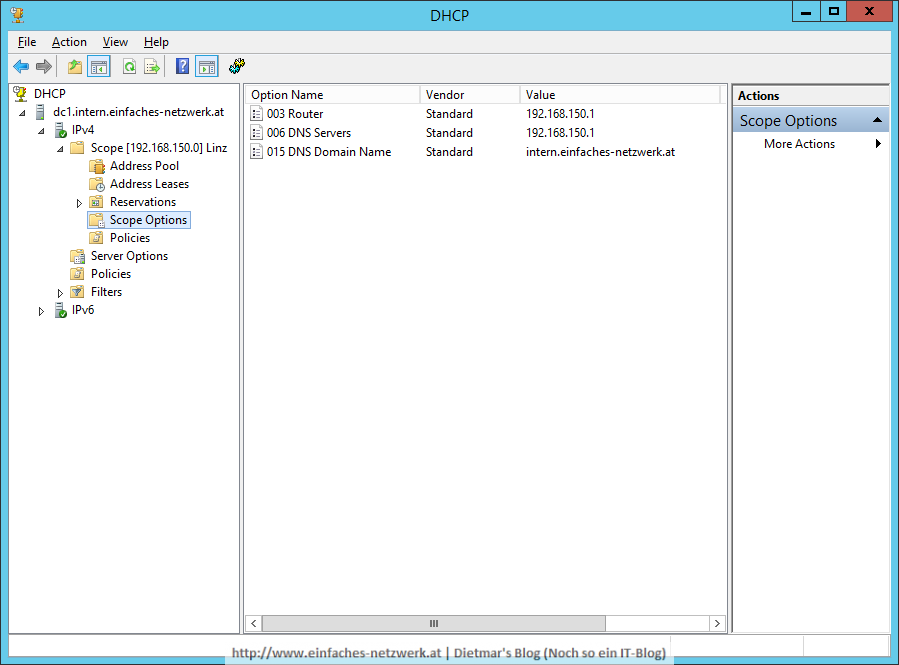
      2. Server name: DC1 > 192.168.150.1 > Next
        DHCP-013
    9. WINS Server > Next
    10. Activate Scope > Yes, I want to activate this scope now > Next
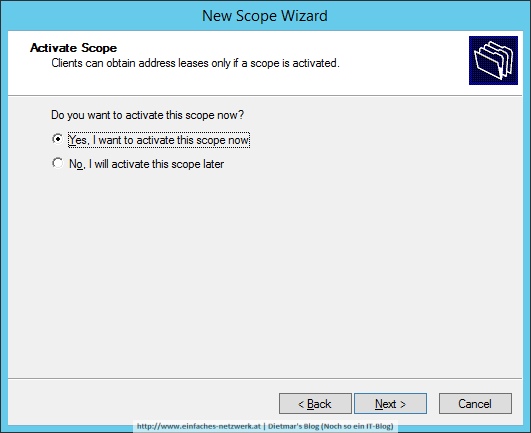
      DHCP-014
    11. Finish 
  5. Fenster schließen
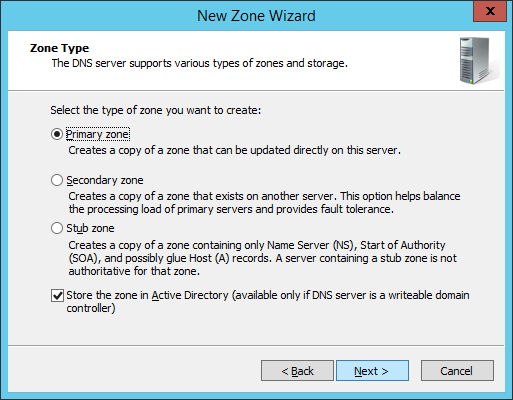
    DHCP-015

Routing konfigurieren

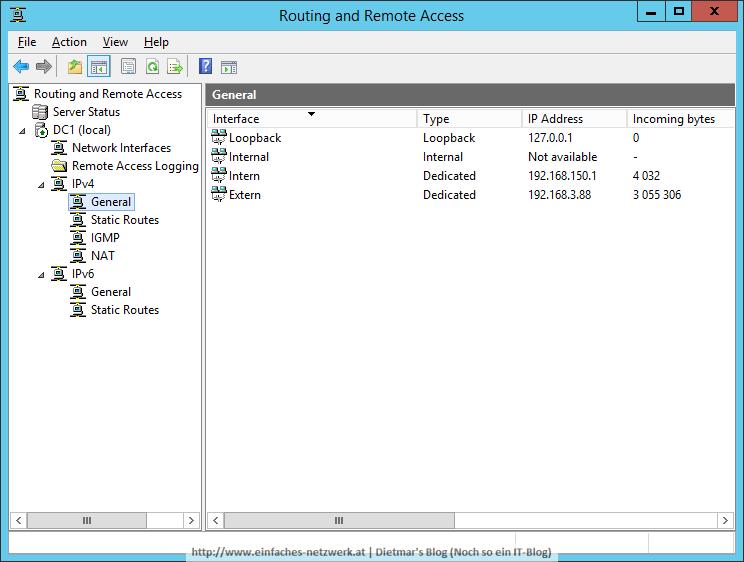
  1. Server Manager > Tools > Routing and Remote Access
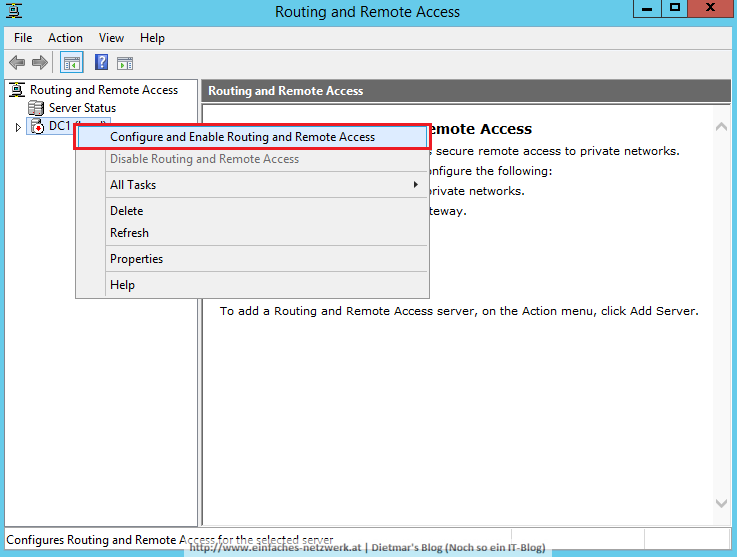
  2. DC1 (local) rechts anklicken > Configure and Enable Routing and Remote Access
    DHCP-016
  3. Routing and Remote Access Server Setup Wizard
    1.  Welcome… > Next
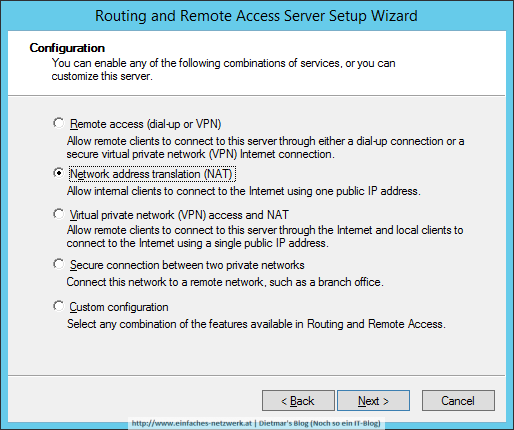
    2. Network addess translation (NAT) > Next
      DHCP-017
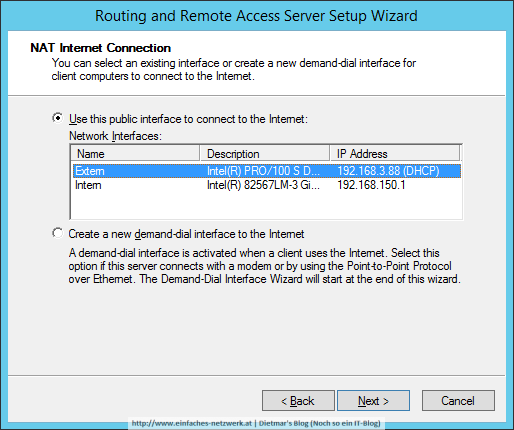
    3. NAT Internet Connection: Extern markieren > Next
      DHCP-018
    4. Finish
  4. Alle Fenster schließen
    DHCP-019

Teil 1b: Active Directory Domain Services installieren und konfigurieren

Die Server-Rolle Active Directory Domain Services installieren und konfigurieren

  1. Als Administrator an DC1 anmelden
  2. Server Manger > Manage > Add Roles and Features
  3. Add Roles and Features Wizard
    1. Before You Begin: Next
    2. Installation Type: Role-based or feature-based installation > Next
    3. Server Selection: DC1 > Next
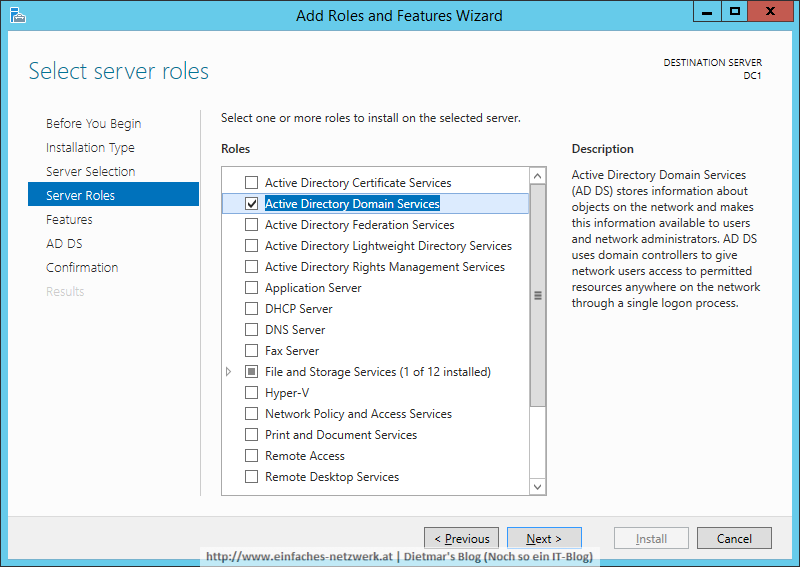
    4. Server Roles: Active Directory Domain Services > Add Features > Next
      ADDS-001
    5. Features: Next
    6. AD DS: Next
    7. Confirmation: Install
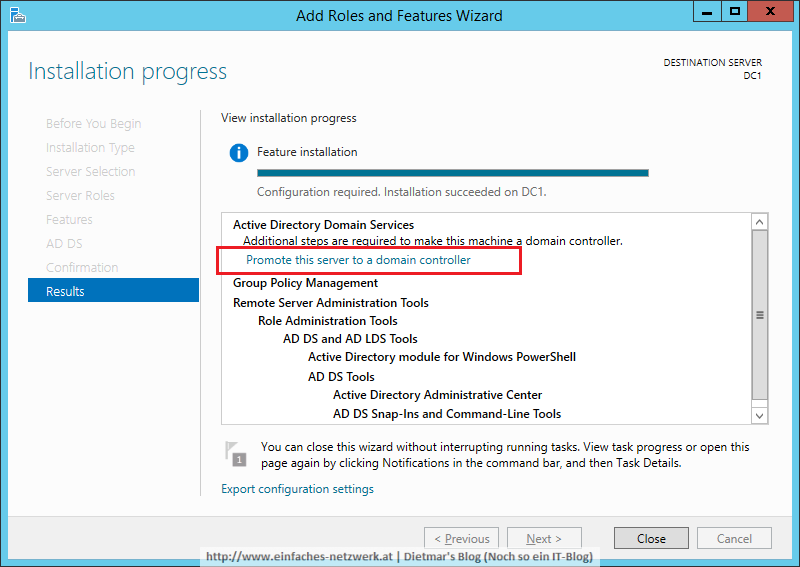
    8. Results: Promote this server to a domain controller
      ADDS-002
  4. Active Directory Domain Services Configuration Wizard
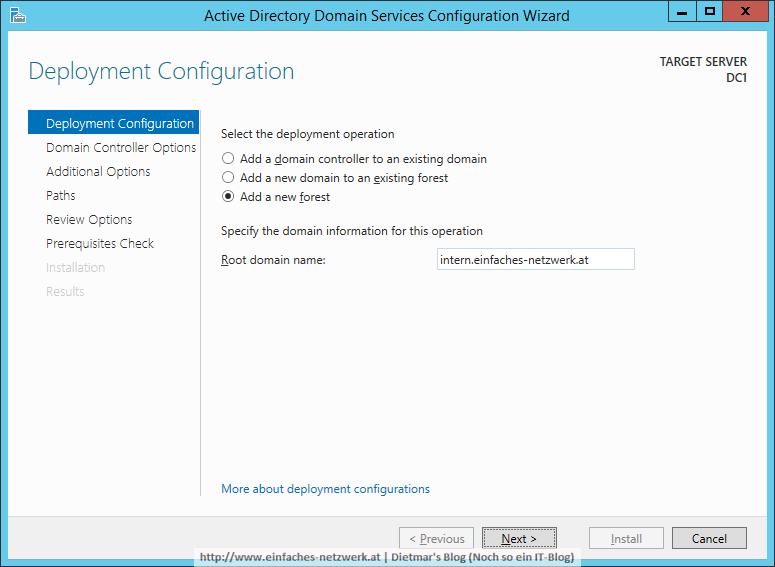
    1. Deployment Configuration
      1. Add a new forest
      2. Root domain name: intern.einfaches-netzwerk.at > Next
        ADDS-003
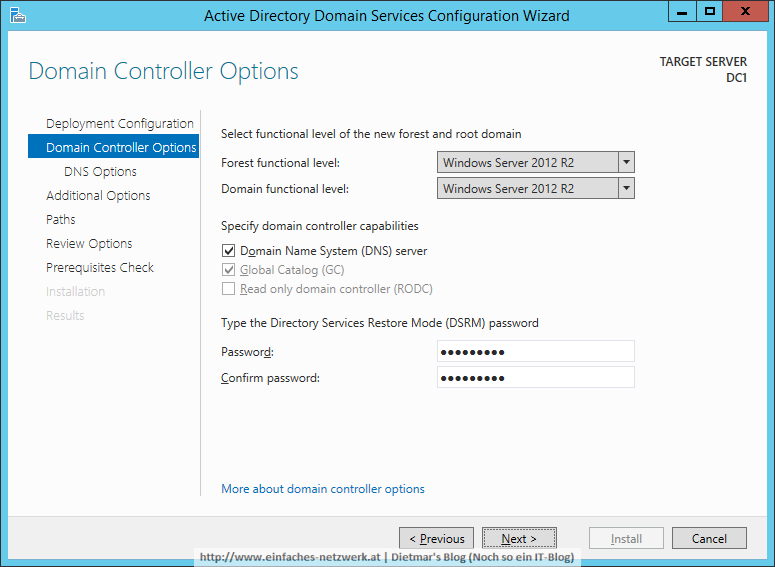
    2. Domain Controller Options
      1. Forest function level: Windows Server 2012 R2
      2. Domain function level: Windows Server 2012 R2
      3. Password: Password1 > Next
        ADDS-004
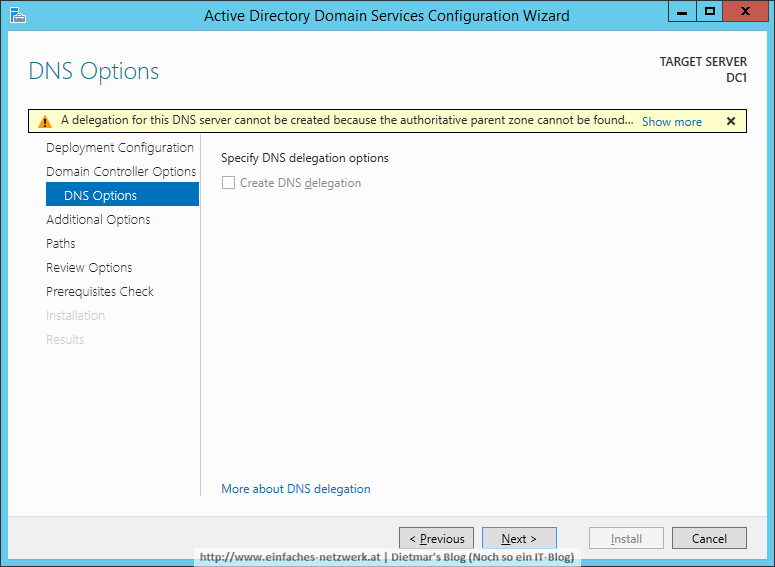
    3. DNS Options: Next
      ADDS-005
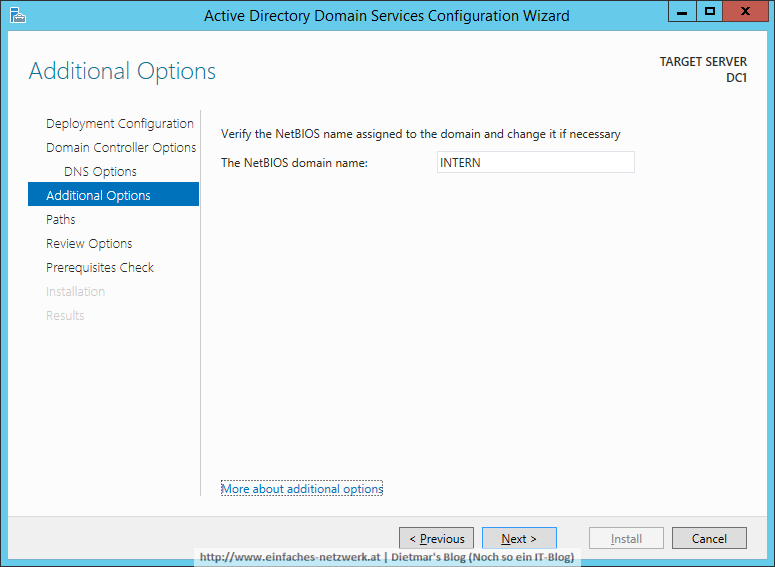
    4. Additional Options:
      1. The NetBIOS domain name: INTERN > Next
        ADDS-006
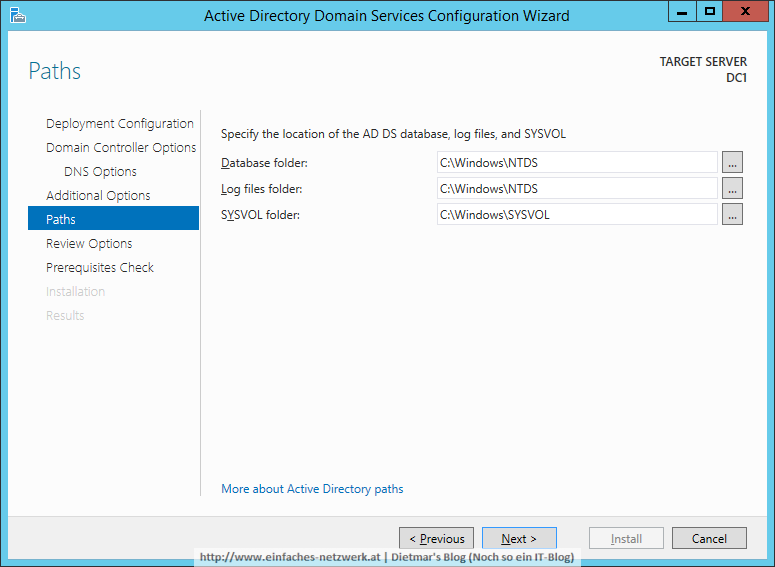
    5. Paths: Next
      ADDS-007
    6. Review Options: Next
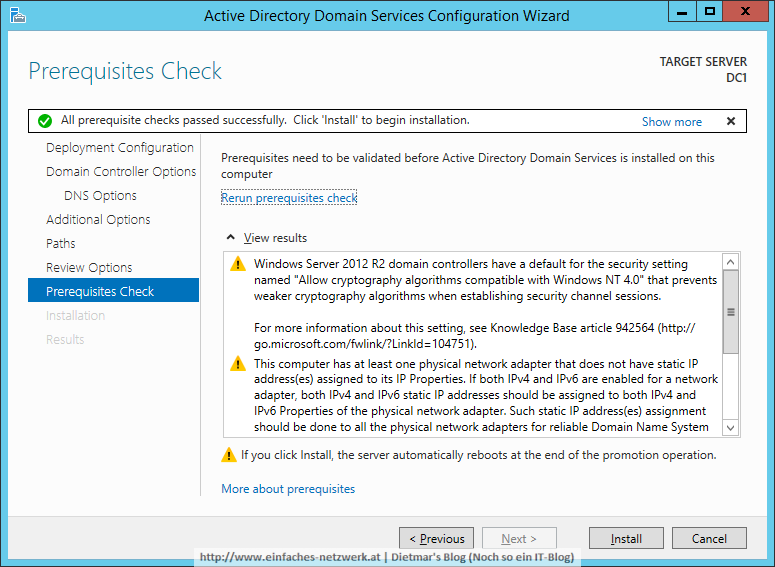
    7. Prerequisites Check: Install
      ADDS-008
  5. Der Rechner wird neu gestartet
  6. Die Anmeldung erfolgt bereits an der Domäne > INTERN\Administrator

Active Directory Sites and Services konfigurieren

  1. Server Manager > Tools > Active Directory Sites and Services
  2. Sites erweitern > Default-First-Site-Name rechts anklicken > Rename
  3. Die Site nach Linz umbenennen
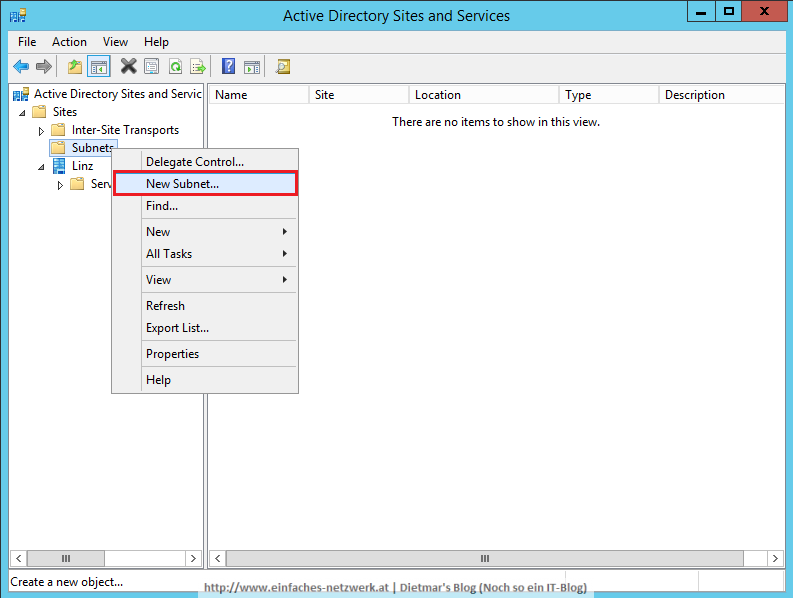
  4. Subnets rechts anklicken > New Subnet…
    ADDS-016

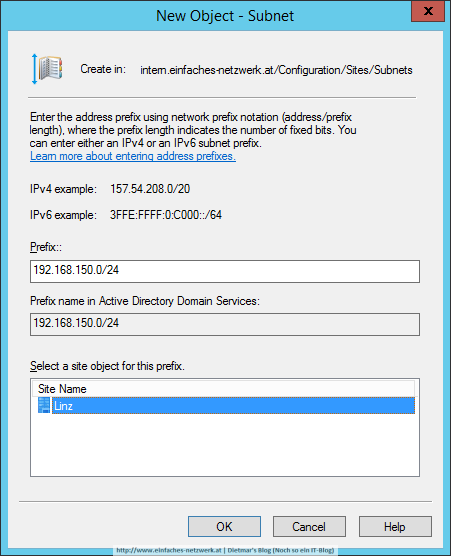
  5. New Object – Subnet
    1. Prefix: 192.168.150.0/24
    2. Select a site object for this prefix: Linz
      ADDS-017

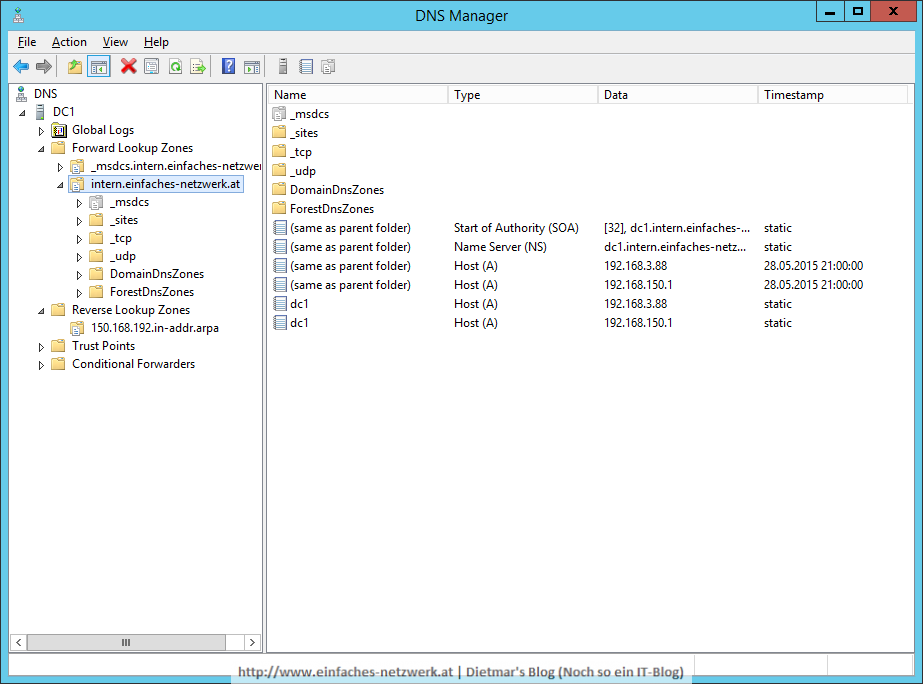
Eine Reverse Lookup Zone in DNS erstellen

  1.  Server Manager > Tools > DNS
  2. Reverse Lookup Zones rechts anklicken > New Zone…
  3. New Zone Wizard
    1. Zone Type: Next
      Install_Active_Directory_022
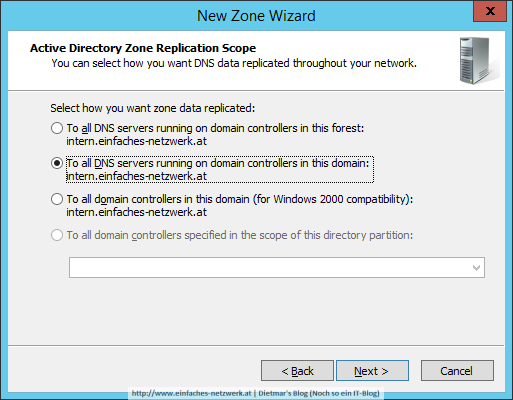
    2. Active Directory Zone Replication Scope: Next
      ADDS-009
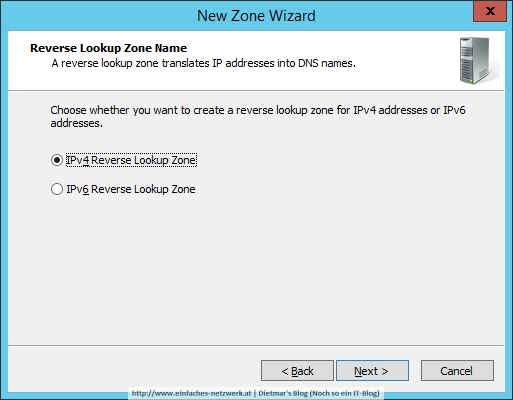
    3. IPv4 Reverse Lookup Zone > Next
      ADDS-010
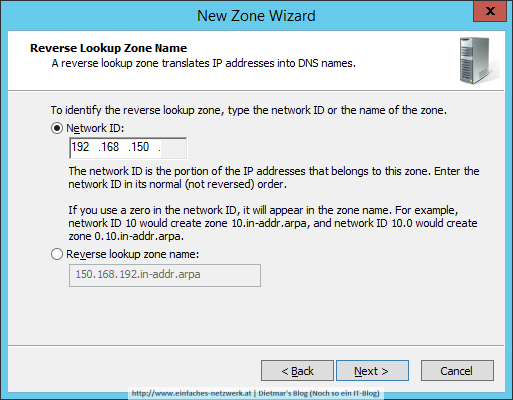
    4. Reverse Lookup Zone Name: Network ID: 192.168.150 > Next
      ADDS-011
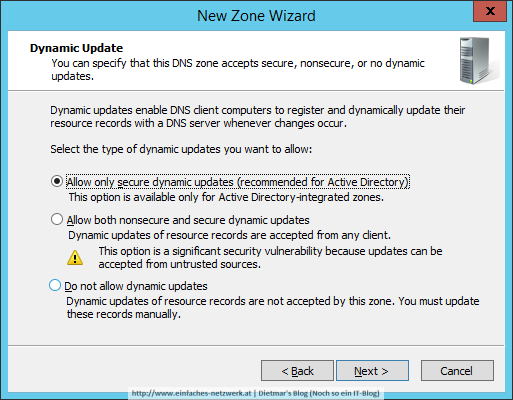
    5. Allow only secure dynamic updates (recommended for Active Directory) > Next
      ADDS-013
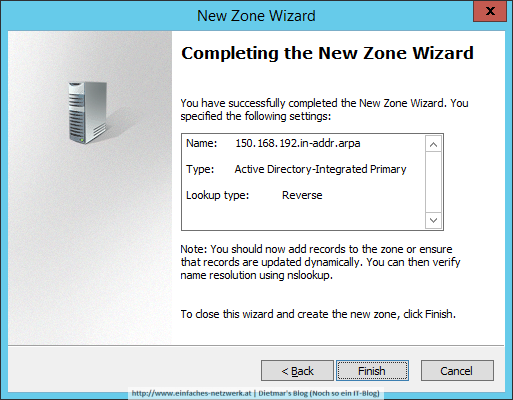
    6. Finish
      ADDS-014
      ADDS-015

Weitere Informationen: Active Directory-Domänendienste

Teil 1a: .NET Framework 3.5 auf Windows Server 2012 R2 installieren

Die .NET Framework 3.5 Features installieren

  1. Als Administrator an DC1 anmelden
  2. Server Manager > Manage > Add Roles and Features
  3. Add Roles and Features Wizard
    1. Before You Begin: Next
    2. Installation Type: Role-based or feature-based Installation > Next
    3. Server Selection: DC1 > Next
    4. Server Roles: Next
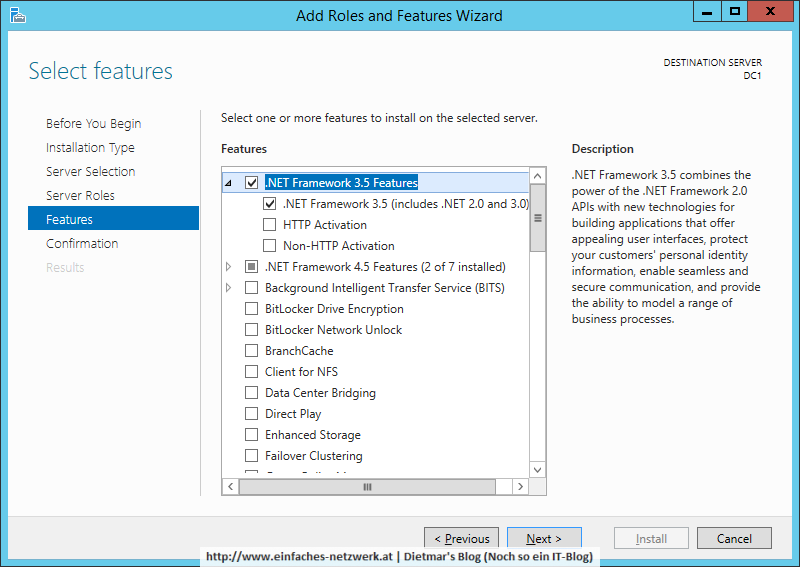
    5. Features:  .NET Framework 3.5 Features anhaken > Next
      NetFX-001
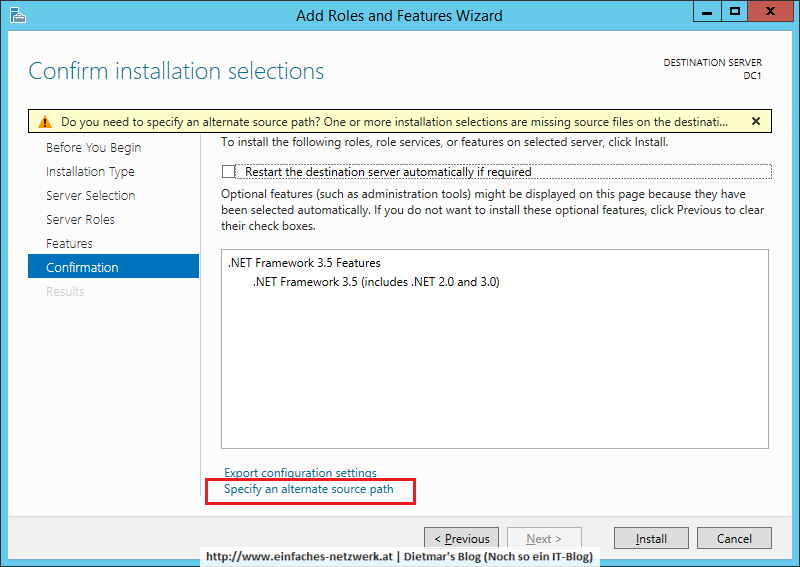
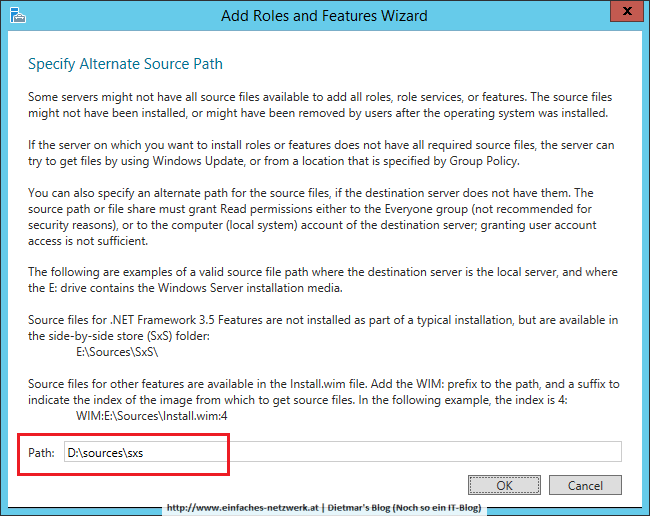
      Das .NET Framework ist nicht auf der Festplatte gespeichert. Deshalb fragt der Wizard nach einem alternativen Speicherpfad. Dieser ist auf der Installations-DVD im Ordner sources\sxs. Es funktioniert aber auch eine Kopie auf einer Netzwerkfreigabe mit UNC-Pfad. Mein DVD-Laufwerk hat den Laufwerksbuchstaben D:\.
      .
    6. Specify an alternate source path
      NetFX-002
    7. Path: D:\sources\sxs > OK > Install
      NetFX-003
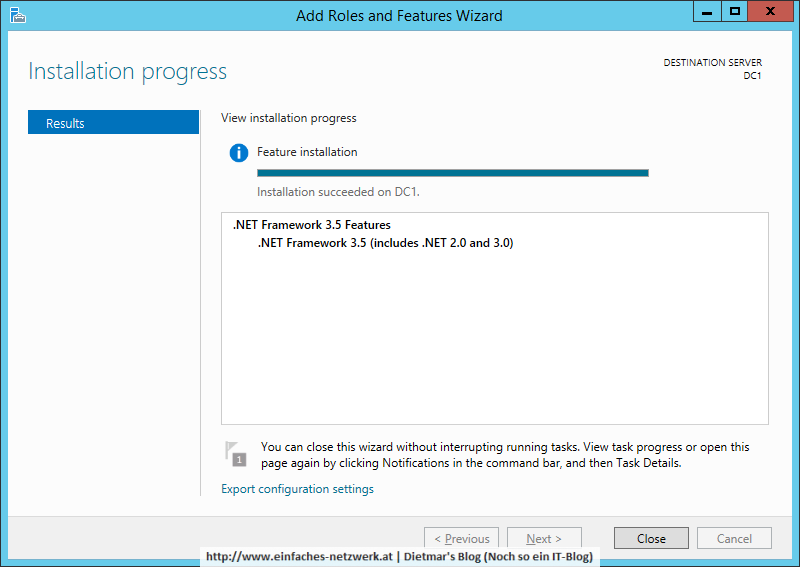
    8. Results: Close
      NetFX-005

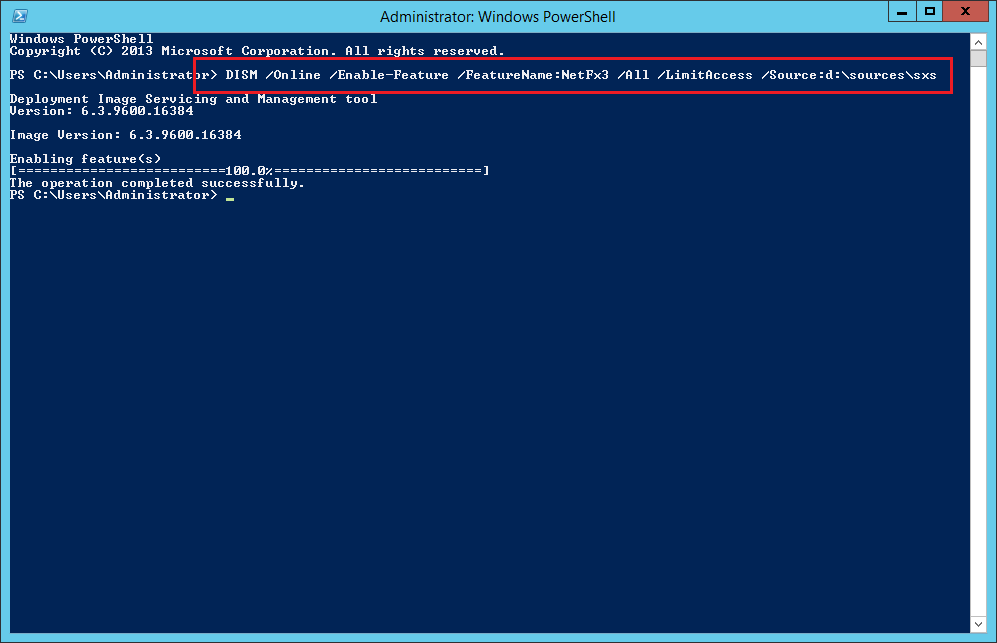
Alternative: Das .NET Framework 3.5 mittels DISM.exe installieren

  1. PowerShell oder Command Line als Administrator starten
    DISM /Online /Enable-Feature /FeatureName:NetFx3 /All /LimitAccess /Source:d:\sources\sxs

NETFX_011

Alternative: Das .NET Framework 3.5 mittels PowerShell installieren

  1. PowerShell als Administrator starten
    Install-WindowsFeature -Name NET-Framework-Core -Source "D:\sources\sxs"
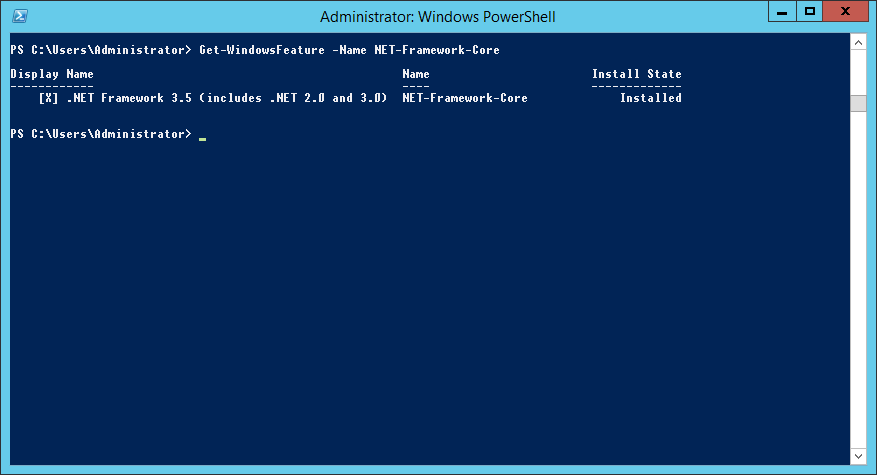
  2. Mit folgendem Befehl das Windows-Feature NET-Framework-Core überprüfen
    Get-WindowsFeature -Name NET-Framework-Core

Teil_2-001

Siehe Microsoft .NET Framework 3.5 Deployment Considerations